Monday, October 30, 2006

JUB For Dummies - Gallery - Chapter 4

Edit Pictures - Chapter 4

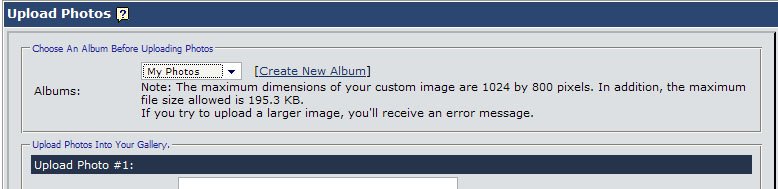
We've figured out the whole Hidden Album, created albums, upload photos to your gallery, now its time to look at what you've uploaded.

1. Click My Settings

2. Click Edit Photos

3. You'll come up with this screen. You can see the pictures you've uploaded, followed by how many times its been viewed and the album the picture is uploaded at.


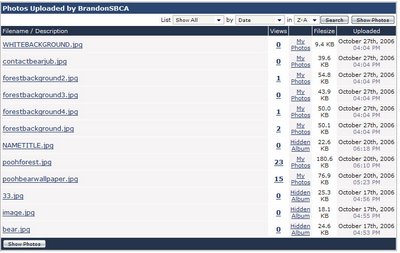
4. You can view each individual picture by clicking the number of views, click the link and it will show your picture as it would look to the public.

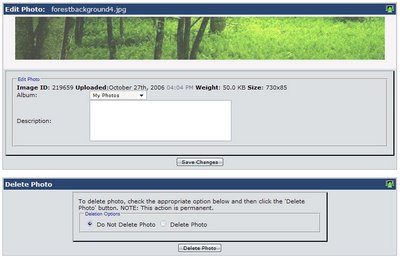
5. If you click the title you can view the picture and edit it by giving it a description, you can move the picture to a different album if you wish, or delete it all together from your gallery. NOTE: This action is permanent.


6. You can also switch between the different albums by selecting to show all albums, the hidden album or specific albums that you would view.

This should of been an easy chapter to understand so hopefully you'll learn how to become a pro at uploading pictures to your gallery. I leave you with this. If you need to increase the storage you'll probably want to Upgrade Your Membership lol

JUB For Dummies - Gallery - Chapter 3

The Hidden Album - Chapter 3

Sounds like some kind of hidden item you find on a game. But its a hidden album that you can store pictures in, you can find this by using the Edit Photos, also you can upload photos to this album as well. It's completely hidden to the public, only you can see and look at the pictures thats unless you use the link to display the photo on a forum, blog, or profile.

Look through the previous chapters of the Gallery section to understand how to upload photos to it. You can view the photos you've uploaded by going to the Edit Photo part view the pictures. I'll explain this in the fourth and final chapter of Galleries. There's not much to explain about this its just a neat feature that can keep your pictures hidden from people. Its also good if you're wanting to upload pictures that you don't want shown on your normal gallery that includes upload tutorials pictures lol

JUB For Dummies - Gallery - Chapter 2

Uploading Photos to your gallery - Chapter 2

Now that we've created albums I will show you the reason why you needed to create an extra album. But in this chapter you'll learn how to upload pictures, learn what size pictures you need to upload and file sizes.

If you need help on resizing pictures I would recommend using this thread as a good tutorial to help you out.

How to: Resizing Pics using Irfanview

Alright I'll tell you the reason why you need to create an album. If you just leave the one default album as your main album without creating an album this will occur. It confuses a lot of people, hell it confused me until I finally found out. So make sure you create an album, if you don't know please go back to Chapter 1.

This is the results of a created album, and uploading a picture


This is the result if you don't have a created album, and uploading a picture


Please make sure you create an album as it will be confusing to you when you are unable to upload stuff to different albums. You'll even be able to upload pictures to your Hidden Album which I'll explain to you in the third chapter.

Okay now onto the tutorial.

1. Click My Settings

2. Click Upload Photos

3. You'll be taken to a screen that will look like this.


4. As you can see you're able to upload pictures and select the album. Select the album of where you wanted the following pictures to be uploaded to. You can select from My Photos, the created folders you've made, and of course the Hidden Album.

5. Get to know the file size and picture sizing as well. Read this message.
Note: The maximum dimensions of your custom image are 1024 by 800 pixels. In addition, the maximum file size allowed is 195.3 KB. If you try to upload a larger image, you'll receive an error message.

1024 by 800 is pretty much the pixels you need to have, if you exceed that amount you'll get a warning message when it might be larger than it. That goes for file size as well, it needs to be under 195.3KB if its larger than that file size you'll get the same message. If you want to increase the photo size it would be good to Upgrade Your Membership to a JUB Supporter. Hopefully you aren't getting tired of hearing this but I hear you get a lot of benefits.

6. When you think you are able to upload a picture without the error messages then all you do is Submit the changes and within seconds your photo will be uploaded.

Now to the next chapter! If things for you are not working then repeat the steps, if you continue to have these problems I suggest you asking for help in the Site Help & Feedback section, it really does help to ask questions. Good luck!

JUB For Dummies - Gallery - Chapter 1

How to use Edit Albums - Chapter 1

We are now on the important chapter this deals with using Galleries for your JUB account. So as a lot of you know who might be uploading pictures, the pictures need to be of a guy that is of the age of 18 and the pictures are not copyrighted. If you are unclear of what you should and should not upload to your JUB gallery than ask an Administrator about this by private messaging Seth, JD, or Corny.

Okay here we go. Well you first want to go to edit Albums, in this chapter you'll learn how to create albums and delete, view or upload to your albums.

1. Head over to My Settings

2. Click on Edit Albums

3. You'll see this screen when you've clicked Edit Albums. It helps you do many things delete albums, create albums, find out how many pictures you have uploaded to each album.


4. At the top you'll see a small weird looking thing displaying how much you have left in your photo storage. Right now for me this is what my statistics displays for my gallery. If you need to more space I suggest you Upgrade Your Membership to a JUB Supporter.


5. Your default album is My Photos all the pictures you upload will always be directed towards that album. You should create an album because when you do this you're able to upload all your pictures to different albums including the Hidden Album which can't be seen by the public.

6. When you create an album your it will be seen on the albums section.


You can delete this if you want, but I would keep the created album as it will serve as a HUGE purpose later on when uploading photos to your gallery.

Now that you're able to create albums its onto the next chapter.

JUB For Dummies - Blog - Chapter 3

Editing your Previous Blog Entries - Chapter 3

Well now that you've been able to create categories, create blog entries there might be some entries that you want to edit, delete or move to another category. So here we go. You click My Settings and then you click Edit Previous Entries you'll have this huge screen with your blog entries, and check boxes to the right of them.


You'll notice that with this you're able to see all the entries you've made, you're able to see how many people posted in your blog and the category of what it was created in, followed by the date of when you created your blog entry.

Remember this, if you want to edit your blog entry click the title of the blog link, if you want to read what user comments you click the number this will help you find out who commented on the blog entry. Also if you want to delete some entries you use the check boxes at the far right located next to the date of entry, then at the bottom you can delete the select entries by selecting Delete from the pull down menu and clicking on the GO button.

So if you want to edit your blog entry you can click on a title of a blog entry. You'll be taken to the screen which almost seems like the screen when creating a blog entry, but in fact with this you're editing the blog entry you selected.


Once you've made all your changes you can save changes and you can go back to the edit blog entries area.

Also remember to read the bolded text to know where to go and what to do. Hopefully this chapter wasn't as hard as the others. You now know how to create a blog of your own on JUB and maintain it. Enjoy.

JUB For Dummies - Blog - Chapter 2

How to create categories - Chapter 2

Okay now that we have the blog thing down if you haven't made a category for your blogs to go in, then maybe this is the chapter to read so you'll know. Well first off if you're in My Settings you'll see in the category section a link that says. Edit Blog Categories. When you finally find that link you'll get a screen that looks something like this.


It will display the many categories you have created for your blog entries including the amount of entries you have, you can click through these and delete them. But we'll discuss that in chapter 3 of Blogs. You can edit the name of your categories, and add more categories if you have several types of blog entries to add to your blog. Once you've created categories just save changes and it will appear along with the Drafts category which is meant for your use, it will be seen by you and only you.

Yay you're becoming a pro at this, just keep it up and you'll be learning the ways of using JUB in no time.