JUB For Dummies - Basics - Chapter 4
How to attach an image to a post - Chapter 4
When viewing most posts you'll see someone posting an image on it, but its in a little thumbnail under their post. Its called an Attachment, the same way people do to attach pictures to emails. Well you can do it to posts as well. Its real simple!
Step 1: You found a picture you'd like to show to other people. Okay well since you're a pro at making posts, all you need to do is just Post a reply. With each post you'll see a category named Additional Options which gives you the change to do many things with your post. But right now we'll be using the Attachments.
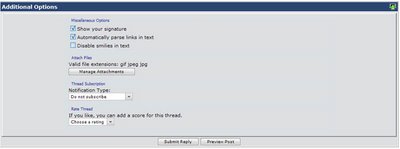
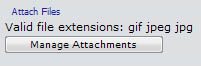
Step 2: You'll see the options that look like this. Click on the Manage Attachments button. Make sure you know that the valid file extensions are gif, jpeg, and jpg.

Step 3: A new window will pop up on your screen giving you a place to put your attachments at. As you can see in the picture below that I already have something in my computer to attach.

Step 4: Okay, now all you have to do is upload the attachment by clicking the first upload button. The second upload button is used if you want to upload an attachment from a website. Also make sure to look at the Attachment key to see the Max filesize, and max width and height for the picture. Which fall around 1200 x 1200 pixels with a max file size of 200KB.
Step 5: After clicking upload you'll see this.

Step 6: You can remove it or leave it there, you can also upload more attachments if you want to. After you're done with that you can go close the window. Now you'll see your attachments on the Reply to post. All you have to do now is just click on Post Reply and you'll see your attachment.
Now you're becoming a JUB pro by posting an attachment. To be perfectly honest, this is probably the hardest thing to do for most members. Enjoy!
When viewing most posts you'll see someone posting an image on it, but its in a little thumbnail under their post. Its called an Attachment, the same way people do to attach pictures to emails. Well you can do it to posts as well. Its real simple!
Step 1: You found a picture you'd like to show to other people. Okay well since you're a pro at making posts, all you need to do is just Post a reply. With each post you'll see a category named Additional Options which gives you the change to do many things with your post. But right now we'll be using the Attachments.

Step 2: You'll see the options that look like this. Click on the Manage Attachments button. Make sure you know that the valid file extensions are gif, jpeg, and jpg.
Step 3: A new window will pop up on your screen giving you a place to put your attachments at. As you can see in the picture below that I already have something in my computer to attach.

Step 4: Okay, now all you have to do is upload the attachment by clicking the first upload button. The second upload button is used if you want to upload an attachment from a website. Also make sure to look at the Attachment key to see the Max filesize, and max width and height for the picture. Which fall around 1200 x 1200 pixels with a max file size of 200KB.
Step 5: After clicking upload you'll see this.

Step 6: You can remove it or leave it there, you can also upload more attachments if you want to. After you're done with that you can go close the window. Now you'll see your attachments on the Reply to post. All you have to do now is just click on Post Reply and you'll see your attachment.
Now you're becoming a JUB pro by posting an attachment. To be perfectly honest, this is probably the hardest thing to do for most members. Enjoy!
posted by Brandon at 11:07 PM
![]()
0 Comments:
Post a Comment
<< Home