JUB For Dummies - Basics - Chapter 3
How to upload an avatar - Chapter 3
Alrighty then. You've learned how to make a post, make a thread you're apart of the JUB family now. But you want to be like everyone else and have a picture to display under your name after each post. Well that is called an avatar, its real simple to upload. But due to the time I have, I'm unable to give a tutorial on how to make it since there are many different software.
My best bet is to go around looking in the Tech forum on how to make pictures, crop, resize. There are free programs on how to do this. Okay let's get started.
First is first rules must be followed.
Please note that you are not allowed to use images of people under the age of 18, even when it is an old photo of yourself.
Step 1: You have your avatar, your avatar size is perfect, and the file size is acceptable as well. You have no idea where to find this though. Okay let's just click on My Settings.
Step 2: On the category Homepage Manager on your Control Panel. Click on Edit Avatar. You'll be brought to a screen that looks like this.
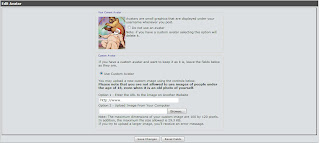
You'll see an empty avatar slot near where mine is.
Step 3 If you have a Custom avatar you show off to JUB. You can easily upload it by using either a website address (Opition 1) or upload it from your own computer (Opition 2). When uploading a custom avatar it will look like this.
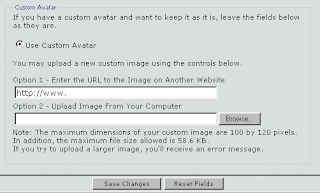
You'll see the little note on the bottom for the maximum dimensions that your custom avatar should. The file size can be up to 60KB. For JUB Supporters you'll see this picture above. For Non-JUB Supporters the dimensions for you would still be 100 by 120 pixels, but in file size you'll be around 30KB
Step 4: When you're ready to upload your avatar jus click Save Changes and you'll see your avatar appear where my avatar is.
Now you'll be able to be apart of JUB with an avatar to show off. Have fun.
Alrighty then. You've learned how to make a post, make a thread you're apart of the JUB family now. But you want to be like everyone else and have a picture to display under your name after each post. Well that is called an avatar, its real simple to upload. But due to the time I have, I'm unable to give a tutorial on how to make it since there are many different software.
My best bet is to go around looking in the Tech forum on how to make pictures, crop, resize. There are free programs on how to do this. Okay let's get started.
First is first rules must be followed.
Please note that you are not allowed to use images of people under the age of 18, even when it is an old photo of yourself.
Step 1: You have your avatar, your avatar size is perfect, and the file size is acceptable as well. You have no idea where to find this though. Okay let's just click on My Settings.
Step 2: On the category Homepage Manager on your Control Panel. Click on Edit Avatar. You'll be brought to a screen that looks like this.
You'll see an empty avatar slot near where mine is.
Step 3 If you have a Custom avatar you show off to JUB. You can easily upload it by using either a website address (Opition 1) or upload it from your own computer (Opition 2). When uploading a custom avatar it will look like this.
You'll see the little note on the bottom for the maximum dimensions that your custom avatar should. The file size can be up to 60KB. For JUB Supporters you'll see this picture above. For Non-JUB Supporters the dimensions for you would still be 100 by 120 pixels, but in file size you'll be around 30KB
Step 4: When you're ready to upload your avatar jus click Save Changes and you'll see your avatar appear where my avatar is.
Now you'll be able to be apart of JUB with an avatar to show off. Have fun.
posted by Brandon at 11:01 PM
![]()
0 Comments:
Post a Comment
<< Home